Managed or DIY, AxonServer runs fine in the cloud, private or public
So far, we’ve looked at Axon Server running locally to get a feel for its behavior and the typical customization points, and in Docker and Kubernetes. We haven’t done it yet to run Axon Server in a VM, and it is for a good reason that we kept that one for last, as we have to do progressively more “prep work” to set up the environment. If there is one thing that Docker containers do well, it is to provide us with a minimal environment to wrap our application in. In that sense, we often see containers referred to as a distribution mechanism and a runtime environment. Thus, you can “install” an application using a container image and get a fully predictable environment.
With a VM, we get a complete machine, even though virtual, which means it has many more “moving parts”. Not all OS distributions give us the same environment, so for many applications, the installation instructions on a full server tend to either explode in a lot of choices to handle the differences or reduce to the same basic instructions as for running locally, leaving it to the user to figure out the details. However, if there is one anti-pattern we do not want to end up with, it is a manually installed application that requires an operator to log on to the server and “do stuff”. This will inevitably lead to a situation where the server is left untouched for a long time because anything you do may make it unstable.
Luckily, nowadays, there’s a focus on automation that can get us out of this, keeping the day-to-day work to a minimum, thanks to DevOps and CI/CD.
Buzzwords to the rescue!
I would like to draw attention to two phrases: “Infrastructure as Code” and “Ephemeral Infrastructure”, and for those that aren’t too familiar with them, I’ll start with a bit of explanation.
Infrastructure as Code is used to signify the use of code to represent the environment, either through the steps needed to achieve it (imperative) or through a description of the intended result (declarative). Dockerfiles and Packer's descriptors are good examples of the imperative approach, while Kubernetes and Terraform follow the declarative approach. The difference we immediately notice is that the imperative approach tends to work well for constructing our building blocks, leaving no doubt in the result. In contrast, the declarative approach works well for composing the actual deployment based on those blocks, allowing the actual installation details to be worked out by tools optimized for the base they’re building it on.
The term “Ephemeral Infrastructure” describes the infrastructure set up temporarily, on-demand, and cleaned up after use. This was a pretty radical change in the Operations world, as the QoS demands on infrastructure tended to make it pretty expensive to set up “just a VM”. However, thanks to a determined shift towards Infrastructure as Code, it started to become possible to set up not just a single server but a complete environment with just a single push of a button. Combine that with the lowered cost of infrastructure components thanks to virtualization and a move to the cloud, and soon you could add a “while you wait” to the delivery catalog. In containerized environments such as Kubernetes, it is the new normal. As a result, test environments, a traditional bane from a cost perspective (or development perspective, due to the concessions to budget constraints), can become an on-demand feature, set up at the start of an automated build and torn down as soon as all the tests are done. If you don’t mind running big tests outside of office hours because you have done your homework and they are fully automated, you can even use off-peak hours and get considerable savings in the cloud.
So what we want to achieve is basically to get the same ease-of-use as with Kubernetes, but now with a Virtual Machine as a result. If we have such an attractive alternative, this is even worth it, which will be discussed later. For now, we’ll focus on building a template for installation and make sure we can automate it, given just the AxonServer JAR file and some common settings. Done right; rolling out a new version should be a push-button affair!
Setting up our base image
We could focus on having just enough pre-installed commands to run a Java application in a container, but on a VM, we get a complete OS, which means we have to choose a base distribution. To get that out of the way: choose your favorite. For AxonServer, it makes no difference at all. The important bit is that all your required logging and management tools are supported, and a Java 11 JDK is installed. As for that last one, depending on your distribution, the name to search for is “java-11-OpenJDK-headless” or “OpenJDK-11-JDK-headless”. Given that we’re not going to use X-Windows, this is the variant I would choose. Still, you’ll probably need also to add the “dejavu-sans-fonts” and “low-fonts” packages because the Java runtime contains code that expects some basic fonts to be available. If you are basing your image on a Debian distribution (including Ubuntu Server), you’ll be using “apt” to install the missing pieces, while the Red Hat world (including CentOS and Fedora) uses “yum” and Suse uses YaST. We’ll get into the details a bit further down.
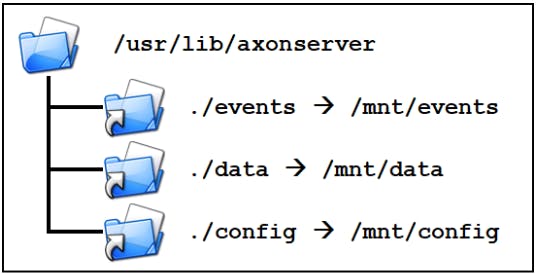
The second thing to think about is where to install AxonServer because we want to integrate it nicely into the Linux directory structure. A common practice is to install services under “/var/lib” or “/usr/local/lib”, depending on it being a “local” installation or not. Since our goal is to create a standard image including Java and AxonServer, we’ll take the first option and use “/var/lib/axonserver”. Also, because we want AxonServer not to run as the superuser, we’ll create a user and group for it with that directory as its home. Depending on how you’ll deal with the logging, you could configure AxonServer to send its output to, e.g., StackDriver directly, but for now, we’ll let it put everything in “/var/log/axonserver”. We could now go further and use “/var/lib/axonserver” to store the state (event store, control-db, replication logs, and such). Still, we want those to survive re-installation and upgrades, so they’ll get a separate disk, mounted under “/mnt”, with symbolic links pointing there.
Creating the installation VM
Now that we have most choices in place, we come to the details, and I need to say something about tooling: we’re going to skip that bit for now. The reason is that, even if you want to unleash the full power of Packer on the image-building process, you first have to find out the steps, so you can just as well start exploring manually. So open a browser to your cloud provider’s console and create a VM based on your favorite or most stable distribution while keeping an editor handy to record everything you do. In my case, I’m using GCE and will create an instance based on CentOS 8, which is the Open Source version of Red Hat Enterprise Linux or RHEL. The steps needed to create a base image using another cloud provider will only differ in creating the initial VM and the clean-up when all is ready. Please note that the hardware choices for this VM, the amount of memory and CPU cores, and the network connectivity will not affect the VMs you will be creating using the prepared image. The only choice you have to be careful about is the CPU type: If you start with ARM, all your eventual servers will need to use that type as well. The same holds for Intel vs AMD: although modern OSses should adapt if they have both alternatives installed, it’s better to keep things predictable.
When the VM is ready, start an SSH session into it. A common practice is that you’ll get a standard user (such as “ec2-user”) or one based on your own account, and this user will have the right to perform commands as “root” using the “sudo” command. The first thing we do is to make sure the latest security updates are applied, and while we’re using the package installer, we’ll also install Java:
$ sudo yum -y update
…[output removed]
$ sudo yum -y install java-11-openjdk-headless dejavu-sans-fonts urw-fonts
…[more output removed]
$ java -version
openjdk version "11.0.7" 2020-04-14 LTS
OpenJDK Runtime Environment 18.9 (build 11.0.7+10-LTS)
OpenJDK 64-Bit Server VM 18.9 (build 11.0.7+10-LTS, mixed mode, sharing)
$
On Debian, you would have used something like “sudo apt update” to the first refresh to local package lists and then “sudo apt upgrade -y” to actually perform the updating. Installing Java is then “sudo apt install -y openjdk-11-jdk-headless”.
Setting up the AxonServer user
Our next step is to create a user who’ll be the owner of AxonServer, and we use the “add user” command for that:
$ sudo adduser -d /var/lib/axonserver -U axonserver
$
This will create the “/var/lib/axonserver” directory, a group named “axonserver” and a user named “axonserver” belonging to that group. First, the directory is made the new user’s home directory, and (group)ownership is set. Next, we prepare the logging directory:
$ sudo mkdir -p /var/log/axonserver
$ sudo chown axonserver:axonserver /var/log/axonserver
$
Now we need to register all these settings in the “axonserver. properties” file, so we have the basic configuration ready:
logging.file=/var/log/axonserver/axonserver.log
logging.file.max-history=10
logging.file.max-size=10MB
axoniq.axonserver.event.storage=./events
axoniq.axonserver.snapshot.storage=./events
axoniq.axonserver.controldb-path=./data
The last three lines may come as a surprise, but as discussed before, we’ll use symbolic links rather than actual directories, so we would get what you see shown in the picture. The network disks for the event store and the control-db will need to be writable, but the configuration drive can be made read-only and use subdirectories for the individual servers that need access to it. An alternative for the “config” folder is to use a “Secrets Vault” and download server-specific files from it during startup.
Finally, we need to add the AxonServer jar and optionally the CLI jar, after which we are ready to dive a bit into running services at (VM) startup.
To Systemd or not (just kidding, we’ll do it)
If you’re a developer and only deal with macOS or Linux (as a subsystem of Windows) from that perspective, you may not have noticed the recently started turf-war (is such a thing ever finished?) around a process called “init”. When processors were using 32 bits or less (yes, it is possible, don’t ask me to return there), the first program to run on any Unix system at startup was called “init”. It checked its startup parameters to determine the target “run level”. Then, it would progress through the different levels up to that target, every step executing the commands configured for entering that level. Being the first, init was known to have process id 1, and it would ensure that certain commands would be restarted if they happened to finish prematurely. For run level 5, which indicated full multi-user mode, an important part was to start the login process on all terminal ports (physical ports, not network ports). The “console” port is probably the most recognizable one that has survived, even for VMs. There is probably a lot more I could tell about this, but this will have to do for the moment.
Implementing this initialization process came to Linux from Unix by way of Minix version 2 and has been kept relatively unchanged for quite a long time. However, the possibilities for customizing the commands executed at different levels did increase. Most commercial Linux distributions recognized the limitations and inserted a step with their own; a more flexible initialization process was invoked. In 2010 a successor to init was proposed in the form of “systemd”, and in good OS-nerd tradition, the battle was fierce. Nowadays, most distributions have happily adopted systemd, although init-diehards often get the option (during the OS installation) to choose their favorite process. What is important for us is that rather than choosing a runlevel and a filename starting with a number (to insert it at the correct point of startup order), we can now “simply” indicate the “Before” and “After” dependencies of our service, and leave the ordering to systemd.
The provider has made a choice for systemd of our base image, and all Cloud providers I checked choose the new default, so I can feel safe in suggesting we use a systemd “service” file to take care of starting and stopping AxonServer. A service file uses the INI file format, where we have three sections:
- The “Unit” section introduces the service (by the “Description” field) and its place in the service order. (think “Before”, “After”, “Wants”, “Requires”)
- The “Service” section provides information on how to run the service.
- The “Install” section tells systemd where to place the service in the global phasing of the services, comparable to the runlevels of “init”.
If we add a small shell script that performs any necessary initializations and then runs AxonServer (not in the background), this will be a class of service called “simple”. However, we can also let it monitor the PID file, as long as we ensure the script starts AxonServer in the background and won’t exist until the PID file exists, which requires type “forking.” We’ll also tell it to ignore standard output, as logging is already sent to “/var/log/axonserver”:
# /etc/systemd/system/axonserver.service
[Unit]
Description=AxonServer Service
Requires=google-startup-scripts.service
After=google-startup-scripts.service

[Service]
Type=forking
User=axonserver
Group=axonserver
ExecStart=/var/lib/axonserver/start-axonserver.sh
PIDFile=/var/lib/axonserver/axonserver.pid
StandardOutput=null
StandardError=null
TimeoutStartSec=10

[Install]
WantedBy=multi-user.target
This piece of magic has a declared dependency on the Google Compute Engine, in the form of the last process to run before ours, specified as “Requires” (we need this one to have started) and “After” (we want it to have finished starting before we get a shot): the GCE specific startup scripts. For Amazon Linux on AWS, we can use a service named “cloud-final”, which has a comparable value.
Finishing up the scripts
Now that we have mentioned it, we still need to add the startup script:
#!/bin/bash

AXONSERVER_HOME=/var/lib/axonserver
cd ${AXONSERVER_HOME}

PIDFILE=${AXONSERVER_HOME}/axonserver.pid
AXONIQ_PIDFILE=${AXONSERVER_HOME}/AxonIQ.pid

if [ -s ${PIDFILE} ] ; then
    PID=$(cat ${PIDFILE})
    if ps -p ${PID} > /dev/null ; then
        echo "AxonServer is already running (PID=${PID})"
        exit 0
    fi

    echo "Cleaning up old PID files"
    rm -f ${PIDFILE} ${AXONIQ_PIDFILE}
fi

java -jar ${AXONSERVER_HOME}/axonserver.jar &
PID=$!

echo ${PID} > ${PIDFILE}
This script first checks if there already is a PID file, and if so, whether the process with that id is still present. If present, we know AxonServer is already running, and our work is done. If not, AxonServer did not exit normally, and we need to clean up the remains, or it will refuse to start. The “AxonIQ.pid” file is made by AxonServer itself, in a format determined by the Spring-boot code that generates the value, but Systemd only wants the number. We do, however, need to remove it if it exists. The last steps are to start AxonServer and store the process id in the PID file. Systemd will be able to use that when it needs to stop AxonServer, and that explains why we cannot use AxonServer’s own PID file because the file format is different.
Assuming we have transferred all the needed files to the VM, we can now clean up and create the service:
$ chmod 755 *.{jar,sh}
$ sudo mv *.{jar,sh,properties} /var/lib/axonserver/
$ sudo chown -R axonserver:axonserver /var/lib/axonserver
$ sudo ls -lF /var/lib/axonserver
total 86324
-rwxr-xr-x. 1 axonserver axonserver  3415852 Jun  7 12:40 axonserver-cli.jar*
-rwxr-xr-x. 1 axonserver axonserver 84967162 Jun  7 12:40 axonserver.jar*
-rw-rw-r--. 1 axonserver axonserver      229 Jun  7 12:42 axonserver.properties
-rwxr-xr-x. 1 axonserver axonserver      494 Jun  7 12:45 start-axonserver.sh*
$ sudo cp axonserver.service /etc/systemd/system/
$ sudo systemctl enable /etc/systemd/system/axonserver.service
Created symlink
/etc/systemd/system/multi-user.target.wants/axonserver.service → /etc/systemd/system/axonserver.service.
$ sudo systemctl status axonserver
● axonserver.service - AxonServer Service
   Loaded: loaded (/etc/systemd/system/axonserver.service; enabled; vendor preset: disabled)
   Active: inactive (dead)
$ sudo systemctl start axonserver
$ sudo systemctl status axonserver
● axonserver.service - AxonServer Service
   Loaded: loaded (/etc/systemd/system/axonserver.service; enabled; vendor preset: disabled)
   Active: active (running) since Sun 2020-06-07 13:54:52 UTC; 3min 7s ago
   Process: 1646 ExecStart=/var/lib/axonserver/start-axonserver.sh (code=exited, status=0/SUCCESS)
 Main PID: 1653 (java)
   Tasks: 47 (limit: 26213)
   Memory: 854.3M
   CGroup: /system.slice/axonserver.service
           └─1653 /usr/bin/java -jar /var/lib/axonserver/axonserver.jar

Jun 07 13:54:52 running-vm systemd[1]: Starting AxonServer Service...
Jun 07 13:54:52 running-vm systemd[1]: Started AxonServer Service.
$
So, here we are. We can reboot the server, and Linux will stop the service, which it can do using the PID we gave it. After all the preliminary work has been done at the system start, it will use our script to start AxonServer again. If you get errors at the service’s enablement, you may need to do some security tweaks first...
A word about SELinux
Actually, I hoped never to run into this, but unfortunately, I have to mention SELinux here, short for “Security-Enhanced Linux”. Whether or not this is enabled and to what level is up to the person first installing the OS, but since we are using a provider-supplied base image, we don’t know in advance. On the standard GCE CentOS 7 image, everything worked just fine with minimal trouble. HOWEVER, when I used the CentOS 8, I found myself unable to start the AxonServer service no matter what I tried, other than getting a distinct impression that it was somehow not allowed. When I finally had my “Aha” moment and put SELinux in permissive mode, meaning that it will complain but not disallow, everything started working again.
If you’re on the software-building side of things like me, you tend to know “just enough” of operations to get your stuff done, but SELinux is rarely part of that segment of knowledge. So if you want to use it, you’ll have to study it, and it ain’t simple. Now in principle, I think security should be as tight as possible, but I had “Study SELinux” somewhat further down my to-do list. Within a few hours, I frustratingly went from “this should be possible” to “let’s just disable it”. However, in the current world, disabling security is not a good idea, and luckily I found help for the hunt. To research this, some additional tools were needed, which for CentOS 8 were in packages named “setools-console” and “policycoretools-python-utils”, and if you want to investigate further, I definitely advise you to look up “semanage” and “research”. I eventually chose the approach in a post advising to keep executables in “/usr/local/bin”. That would let them inherit the “bin_t” type, which systemd is allowed to execute.
So we are going to use two commands: first, “restorecon” to set all files to their default security context, so we have a known starting point, and then “chcon” to give only the startup script the “bin_t” type. Both these commands are in the default packages so that we can use them without problems:
$ sudo restorecon /var/lib/axonserver/*
Relabeled /var/lib/axonserver/axonserver-cli.jar from unconfined_u:object_r:user_home_t:s0 to unconfined_u:object_r:var_lib_t:s0
Relabeled /var/lib/axonserver/axonserver.jar from unconfined_u:object_r:user_home_t:s0 to unconfined_u:object_r:var_lib_t:s0
Relabeled /var/lib/axonserver/start-axonserver.sh from unconfined_u:object_r:user_home_t:s0 to unconfined_u:object_r:var_lib_t:s0
Relabeled /var/lib/axonserver/axonserver.properties from unconfined_u:object_r:user_home_t:s0 to unconfined_u:object_r:var_lib_t:s0
$ sudo chcon -t bin_t /var/lib/axonserver/start-axonserver.sh
$
You can see above that this will mark the files as “unconfined”, allowing AxonServer unlimited network access.
Adding the persistent disks
If we delete the VM we created above and then create a fresh one from the same image, we get an empty event store, as we had with our Docker container, unless we add volumes/disks. So we create two disks: one for the control-db, which can be small and fast, the other for the event store, which needs to be bigger and maybe a bit slower to conserve costs. Fast SSD storage tends to have smaller size limits and higher costs per GiB. When we create our initial VM (to create the image), we can mount these disks to it, format them, and create symbolic links for the “data” and “events” directories pointing to these disks.
For example, if we create a 1GiB disk named “running-vm-data” and a 100GiB disk “running-vm-events” and connect them to our VM when we create it, they will show up as available devices. A disk named “some-disk” will be available on GCE as “/dev/disk/by-id/google-some-disk”. We can format it using (a variant of) the “mkfs” tool and mount it at “/mnt/some-disk”. In the example script below, I use the disk’s unique id to make future mounts independent of the disk’s name:
#!/bin/bash

DISK_NAME=$1
DISK_DEV=/dev/disk/by-id/google-${DISK_NAME}

DISK_MNT=$(findmnt -n -o TARGET ${DISK_DEV})
if [[ "${DISK_MNT}" != "" ]] ; then
    echo "Disk ${DISK_NAME} already mounted as ${DISK_MNT}."
    exit 0
fi

DISK_UUID=$(blkid -s UUID -o value ${DISK_DEV})
if [[ "${DISK_UUID}" == "" ]] ; then
    echo "Formatting ${DISK_DEV}"
    mkfs.ext4 -m 0 -F -E lazy_itable_init=0,lazy_journal_init=0,discard ${DISK_DEV}
    DISK_UUID=$(blkid -s UUID -o value ${DISK_DEV})
fi

DISK_MNT=/mnt/${DISK_NAME}
echo "Mounting ${DISK_DEV} as ${DISK_MNT}"
cp /etc/fstab /etc/fstab.backup
echo "UUID=${DISK_UUID} ${DISK_MNT} ext4 discard,defaults,nofail 0 2" | tee -a /etc/fstab
mount ${DISK_MNT}
chown axonserver:axonserver ${DISK_MNT}
I use “findmnt” to check if a disk is already mounted, “blkid” to get a formatted disk’s id, “mkfs.ext4” to format the disk, and “mount” to actually mount the disk. Note the so-called “tee-trick”, which is considered the safer way to add lines to an important file. With this in place, we can actually create an “init-service”, which is scheduled to run before AxonServer to format and mount the disk if needed. First, we bundle the disk-mounting in a single script:
#!/bin/bash

AXONSERVER_HOME=/var/lib/axonserver
cd ${AXONSERVER_HOME}

if [ -e ${AXONSERVER_HOME}/data -a ! -L ${AXONSERVER_HOME}/data ]
then
    echo "Removing non-symlink 'data'"
    rm -rf ${AXONSERVER_HOME}/data

    ${AXONSERVER_HOME}/mount-disk.sh $(hostname)-data
    ln -s /mnt/$(hostname)-data ${AXONSERVER_HOME}/data
fi

if [ -e ${AXONSERVER_HOME}/events -a ! -L ${AXONSERVER_HOME}/events ]
then
    echo "Removing non-symlink 'events'"
    rm -rf ${AXONSERVER_HOME}/events

    ${AXONSERVER_HOME}/mount-disk.sh $(hostname)-events
    ln -s /mnt/$(hostname)-events ${AXONSERVER_HOME}/events
fi

if [ -e ${AXONSERVER_HOME}/config -a ! -L ${AXONSERVER_HOME}/config ]
then
    echo "Removing non-symlink 'config'"
    rm -rf ${AXONSERVER_HOME}/config

    ${AXONSERVER_HOME}/mount-disk.sh axonserver-config
    ln -s /mnt/axonserver-config/$(hostname) ${AXONSERVER_HOME}/config
fi
Name the above “axonserver-setup.sh” and place it with the “mount-disk.sh” script in the AxonServer directory, and activate it as a service named “axonserver-setup.service”:
# /etc/systemd/system/axonserver-setup.service
[Unit]
Description=AxonServer Setup Service
Requires=google-startup-scripts.service
After=google-startup-scripts.service

[Service]
Type=simple
ExecStart=/var/lib/axonserver/axonserver-setup.sh

[Install]
WantedBy=multi-user.target
Because we don’t specify a username, this will run as root to do the formatting and mounting. If symbolic links already exist, it will not do anything, assuming all is already fine. The AxonServer service itself needs to be adjusted to specify this” axonserver-setup” service for the “After” and “Requires” lines.
Creating the image
Some cloud providers have specific instructions for preparing a disk for image creation, mostly cleaning up. For example, for GCE, we only need to stop the VM and then copy the disk to a disk image, after which we can delete the VM altogether:
$ gcloud compute instances stop running-vm
Stopping instance(s) running-vm…
Updated
[https://compute.googleapis.com/compute/v1/projects/my-project/zones/europe-west4-a/instances/running-vm].
$ gcloud compute images create axonserver-se-4.3.5 \
> --source-disk=running-vm --source-disk-zone=europe-west4-a \
> --family=axonserver-se
Created
[https://www.googleapis.com/compute/v1/projects/my-project/global/images/axonserver-se-4-3-4].

NAME                 PROJECT        FAMILY         DEPRECATED  STATUS
axonserver-se-4-3-4  my-project     axonserver-se              READY
$ gcloud compute instances delete running-vm -q
Deleted
[https://www.googleapis.com/compute/v1/projects/my-project/zones/europe-west4-a/instances/running-vm].
$
We now have an image that can be used to create as many VM’s as we want.
Upgrading AxonServer
If we get a new release of AxonServer, we can benefit from the preparations above because all we need to do is:
- Build the new image, preferably automated using something like packer,
- Delete the current VM, which should leave the data disks untouched, and
- Create a new instance from the new image.
The new instance mounts the disks and picks up the data, and with minimal downtime, we have a new version of AxonServer up and running.
AxonServer EE in VMs
Running AxonServer SE in a VM seems somewhat unbalanced for the amount of preparation vs the benefits of automated deployment, especially if we have just a single instance of it running. On the other hand, in a disaster recovery scenario, anything manual poses an irreproducibility risk. Still, if the rest of the application is deployed on Kubernetes, it may not be worth the investment. The story is different for a cluster of AxonServer EE nodes, as we now have more than one deployment anyway. The availability advantages of a multi-node cluster can be stretched across multiple regions, which Kubernetes clusters generally do not allow. Also, tags on AxonServer nodes allow us to mark a server's region so that AxonFramework clients automatically select the nearest node. Even if we don’t need such a dispersed deployment or don’t want it due to the increased overhead on event store transactions, having a passive backup node (see part 1) in a different region gives us a tremendous advantage in a disaster recovery scenario. We can even use hybrid scenarios where the active cluster runs in Kubernetes, as close to the client apps as possible, with only the backup node (or nodes) in a VM. But whichever way we do this, we need the nodes to talk with each other, which brings up networking...
Networking in the Cloud
As we discussed in the earlier installments, an AxonServer EE node has a distinct networking identity, which is reflected in the form of its hostname. In the cloud, however, this hostname can vary, depending on the specific commands used to create the instance and provider's policies. On GCE, the hostname is by default equal to the instance name you use when creating it, which simplifies things a lot. On AWS, the hostname will always start as a name generated from the IPv4 network address. The instance id (comparable to the instance name for GCE) is a randomly generated name, somewhat comparable to a UUID neither will help us much. Even worse, if you stop and then start the instance, it will have a different IP address, and consequently, a new hostname. Instead, you can assign tags to instances, and the tag named “Name” is special because its value is immediately shown on the dashboard in the “Name” column. We can use this with a little initialization magic called “cloud-init”. While creating the instance, we want to provide the following YAML file as “user data”:
#cloud-config
packages:
 - curl
 - awscli
preserve_hostname: true
runcmd:
 - export AWS_REGION=$(curl -s http://169.254.169.254/latest/dynamic/instance-identity/document | grep region | awk -F\" '{print $4}')
 - mkdir -p /root/.aws
 - echo -e "[default]\nregion=$AWS_REGION" | tee /root/.aws/config
 - export FQDN=$(aws ec2 describe-tags --filters "Name=resource-id,Values=$(curl -s http://169.254.169.254/latest/meta-data/instance-id)" "Name=key,Values=Name" --output=text | cut -f 5)
 - hostnamectl set-hostname --static $FQDN
The above starts by telling the startup scripts we want to install “curl” and the AWS CLI and fixing the hostname across reboots. Next, we run a few commands:
- Retrieve the region from the instance’s metadata and set it in an environment variable named “AWS_REGION”.
- Create a configuration file for the CLI tool that reflects this region setting.
- Use the CLI tool to retrieve the value of the “Name” tag.
- Use the “hostnamectl” tool to set this name as our hostname.
Note that this will only work if the instance has the “ec2:DescribeTags” role assigned through an instance profile. If you do not assign this role, the CLI tool will complain it needs credentials.
Warning: Although AWS superficially considers the “Name” tag to be “just a tag”, it impacts several things. If you want to replace the instance with another one during a version upgrade, just terminating the old instance will not be enough, as it will linger in the list for a while considering the name taken. You must remove the “Name” tag from the old (terminated) instance before you can reuse its value for a new one.
For both providers, it is probably best to set up an internal DNS zone on the VPC network so that the nodes can find each other and we have a proper (predictable) name for the certificates. Normally you will not need to expose AxonServer itself using public IP addresses, so for most cases. Instead, you would create VM instances that are only connected to the internal network.
Changes in the Configuration
We need to do the first thing for AxonServer EE to add a configuration property for the replication log directory, which we can add to the “data” disk, given that it tends to be relatively small. The replication logs typically measure in Megabytes rather than Gigabytes and stay that way thanks to regular cleaning. Therefore, it is probably best to configure it as “./data/log”, so it will be in a subdirectory relative to the control-db.
The second is to add the “autocluster” options, using the (internal) DNS name for the first node. Apart from that, there is no difference from the Kubernetes deployment regarding the properties we want to set. You can actually use a common configuration disk that you mount on all nodes in Read-Only mode, and that can give you the same effect as a ConfigMap or Secret. The “axonserver-setup.sh” script we made earlier already uses a subdirectory named “/mnt/config/${HOSTNAME}”, so you can easily manage all configurations on a single disk. A more secure solution that takes a bit more work is to set up a vault (or configure one from your provider’s catalog) and retrieve the required configuration files from there.
VMs versus Kubernetes
I already touched on some reasons for choosing Kubernetes or VMs in the previous installment and the previous sections. It remains one of the most popular questions we receive from people starting to look at their deployment plans. I hope this article series has shown that there is no generic reason to advise against either platform. The differences lie not only in the amount of work needed to adapt the AxonServer configuration to your specific requirements because, let’s face it, but Kubernetes can also easily win that race hands down. The most important questions are more about the availability of the platform, the capabilities of your CI/CD tooling, and the typical infrastructure requirements. If your setup needs automated failover and must survive the loss of a complete “cloud region”, then Kubernetes might not be able to help due to the restrictions on node locations. At the time of writing this, Google’s GKE, Amazon’s EKS, and Azure’s AKS allow clusters to span multiple availability zones but not multiple regions. You could conceivably bind clusters in different regions together, but this will require an expert in the provider’s networking products to get it to work seamlessly, and you must also be able to expose AxonServer’s gRPC ports 8124 and 8224 for Pods in the other clusters, with fixed DNS names. A lot of this “fixating” is, in my opinion going against the spirit of what Kubernetes tries to offer in flexibility, and using VMs may turn out to be a lot easier, while not harming the client applications’ possibilities at all, even though they remain “inside.”
So, if what you want is the benefit of a clustered AxonServer deployment, without the need for the extremer levels of availability that a multi-region deployment offers, Kubernetes may be just the ticket for you. Just make sure you have the event store volumes backed up and an (automated) deployment plan for a fresh cluster if the need ever arises. On the other hand, if you want (or need) more control over location and cluster structure, then it is well worth the trouble of looking at a VM deployment. For the client applications deployed in Kubernetes, it will not make much difference.
Finishing up
We started this series by looking at AxonServer and how we can configure it. Being a Java application, setting it up and running it is pretty standard. However, if we want to make it into a long-running service and preferably one that can be easily upgraded when new releases become available, we need to make sure the event store and control-db are stored in a place that survives that process. Using a Docker image for the installation enables us to upgrade a lot less painful. Still, although there are good facilities for providing the AxonServer image with persistent storage, we soon run into platform specifics. Bare Docker, Docker Swarm, and Docker Compose each has their own ways of bundling the deployment of a container image with storage volumes and network configuration. We also looked at ways of providing common configurations without having to change individual container’s starting instructions.
Kubernetes is obviously the best example of a well-designed platform for running applications packaged in container images, focusing on the small and scalable. It also adds namespaces that we can use to separate application domains, even opening the way for using a single cluster for multiple deployments of the same set of applications on a single cluster. Storage is pretty well worked out, even though we can see some obvious opportunities for a little refactoring in the different options available. Secrets and ConfigMaps provide for simple deployment of the configuration files we need. However, the downside to this focus on “small-and-scalable” is that applications like AxonServer, designed to handle the scalability themselves, do not always fit the mold. First of all, we have to use a StatefulSet to ensure AxonServer has a predictable and persistent (network) identity. Next, scaling an AxonServer Standard Edition deployment will only get us a group of fully independent single-node deployments rather than the cluster Kubernetes expected. Finally, we can only use Kubernetes’ scaling for a cluster of Enterprise Edition nodes if we’re sure the nodes will all get the same role. We can, however, easily work around these limitations by approaches like the use of separate StatefulSets per node and then never scale them up. Using this approach lets us bring down individual nodes in an Enterprise Edition cluster for maintenance by scaling that particular node down to zero and back to one when done. A single set scaled to the number of nodes we want does not allow for this.
The most flexible option, especially if we want to build a multi-region cluster, is to use full Virtual Machines at the cost of more work in the preparation. Tools like Packer, Puppet, Ansible, and Terraform (and many more) can help us automate the actual deployment, but acquiring the required knowledge may take quite a bit of time, especially if we want to go the extra mile and get security done right. K8s-based platforms provide an easier adoption path than traditional VM-based platforms as they abstract the infrastructure layer from higher-level applications. Go ahead and download Axon here.